
Follow the instructions here to get your website looking exactly like our demo!

Table of Contents
- List of plugins used
- Color Scheme/Main Hex Codes
- Uploading and installing theme
- Adding header
- Changing the Color Scheme
- Customizing the Colors
- Enabling navigation
- Homepage widgets
- Featured posts wdget
- Adding social media icons
- Adding in Responsive Slider
- Adding in Subscription Box/Genesis eNews Extended
- Adding an Instagram widget
- Recent posts widget (sidebar)
- Adding footer widgets
- Setting up the Portfolio
- Setting a page to display your blog posts
- Setting up share icons at bottom of posts
- FAQ
Plugins
- Contact Form 7: for the contact form on the contact page
- Genesis eNews Extended: for the subscribe areas
- Genesis Responsive Slider: for the homepage slider
- Jetpack: for sharing icons at bottom of posts
- Regenerate Thumbnails: if your images are looking wonky, you’ll need this
- Simple Social Icons: for all social media icons
Color Scheme Main Hex Codes
Default: #cfe5d8
Pink: #f4dedb
Daffodil: #f8f4e9
Lavender: #e5dce9
Gold (Link color): #b69c5e
Uploading & Installing the Theme
See our video on installing our WordPress themes.
Adding the header in WordPress
Add your site title and tagline in WordPress by going to Settings >> General
UPLOAD YOUR OWN HEADER: Go to Appearance >> Header and upload your header. Your header should be 700 x 250 pixels before you upload.
IF YOU DO NOT HAVE A APPEARANCE >> HEADER PAGE: click here for instructions
Changing the color scheme
On your Genesis >> Theme Settings page, you have the option to select your color scheme under “color style.”
Customizing the colors
Click on Appearance >> Customize and then click on Colors. Change the colors to your liking and save! (Make sure you’re using the “default” color scheme before you change colors.)
(This feature was released September 24, 2015. If you purchased & installed your theme prior to this date, this is not available to you.)
To enable navigation
Go to Appearance >> Menu. Create and save a menu with your desired links. Then, select the name of the menu from the drop down box under either “primary navigation menu” (located below the header) or “secondary navigation menu” (located below the primary navigation menu).
For a video tutorial on adding in navigation menus, click here.
Homepage Widgets
This theme features a widgetized home page with four areas:
- Home Top
- Home Middle Left
- Home Middle Right
- Home Bottom
Control what shows up here by going to Appearance >> Widgets and dragging and dropping widgets into these areas. You have lots of options! Click on the following thumbnails to see how to configure each layout. More information on the widgets you need can be found throughout this installation guide.


Featured Posts Widget
The featured posts widget you’ll need for most of the homepage layout options is built right into Genesis. To add it, go to Appearance >> Widgets >> Genesis Featured Posts and match the settings to the settings for your chosen homepage layout option.
Adding in the Social Media Icons
First, download and install Simple Social Icons. To add, go to Appearance >> Widgets >> drag and drop a “Simple Social Icons” widget to where you want it to appear. Use these settings (colors are for the default color scheme–use the hex codes included at the top of this page depending on what color scheme you’re using):
Adding in Responsive Slider
You’ll need to install the Genesis Responsive Slider plugin (go to Plugins >> Add New and search for “Genesis Responsive Slider”). Visit this video tutorial for how to configure the slider – make sure you use the specific display settings for the homepage option you’re using.
Adding in Subscription Box/Genesis eNews Extended
You can add in a subscription box in several different areas: the sidebar, homepage widget, etc. This tutorial covers how to set up your subscription box.
Adding an Instagram Widget
Adding in your own custom Instagram widget is super simple! Go to Snap Widget and create a free widget. Fill out the information. If you’re creating a 2×2 grid, you’ll want the thumbnail size to be 127 px. Copy and paste the code into a Text widget under Appearance >> Widgets in WordPress.
Recent Posts Widget (Sidebar)
Add your own ‘recent posts’ widget in your sidebar by going to Appearance >> Widgets >> Genesis Featured Posts. Make sure ‘Order by: Date’ is selected and that you only have the post title showing (no content, excerpts, or thumbnails).
Setting up the Portfolio
First, you will need to install the Portfolio Post Type plugin and activate it. Once you’ve done that, you should see a “Portfolio” tab in the sidebar of your WordPress administration area. From here, you can add in your posts. I like to set up my categories first, and then you can add in posts and tag them in their specific category. The featured image that you set for each post is what displays on the portfolio category pages.
You can view your main portfolio at http://yoururl.com/portfolio/, and your category pages at http://yoururl.com/portfolio_category/your-category/
If you’re receiving a 404 error page when you view your portfolio, you might need to reset your Permalinks. To do this, go to Settings >> Permalinks and click “save” on the bottom, without making any changes.
To ensure your title displays on the portfolio page, go to your main category page and edit that category. Add your title where it says “Archive Headline”.
To watch a video tutorial on this set-up process, click here.
(The portfolio feature was released September 24, 2015. If you purchased & installed your theme prior to this date, this is not available to you.)
Adding in Footer Widgets
This theme features a 3-column footer widget area on the bottom. Control what shows up here by going to Appearance >> Widgets and dragging and dropping widgets into the Footer 1, Footer 2, and Footer 3 widget areas.
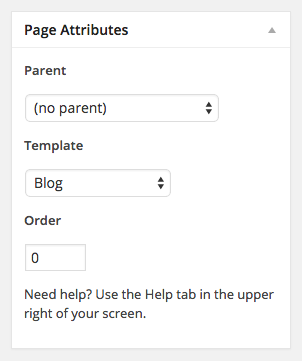
Setting a Page to Display your Blog Posts
If you’re using the front page layout but still want to have a page that displays recent blog entries, go to Pages >> Add New and create a new page called “Blog.” In the Page Attributions section, make sure “Blog” is selected under “Template.”
Setting up Share Icons at Bottom of Posts
You might have noticed the share icons that appear at the bottom of each post:
To set this up, you’ll need to install the Jetpack plugin by going to Plugins >> Add New and searching “Jetpack.” The instructions will walk you through syncing Jetpack with your WordPress.com account (if you don’t have one, you can create one from free). Once you have it set up and synced, go to Settings >> Sharing and ensure your settings match the following:

FAQ
Q. My images aren’t displaying properly/are the wrong sizes.
Please install Regenerate Thumbnails plugin and run through the images in questions to “reset” them.
Q. How do I change the favicon?
Find instructions on how to swap out the default Genesis favicon for your own right here.